 where you also find preset themes.
Where you change the appearence of the chart. Changes are immediately displayed in the preview and apply only for the current job.
The settings is found in the print preview toolbar
where you also find preset themes.
You can choose to save the current settings as:
 Save theme as default
that saves current settings as default for this chart type or
Save theme as default
that saves current settings as default for this chart type or
 Save settings as theme
that will save the current settings as a new theme or alternatively overwrite the existing one.
Save settings as theme
that will save the current settings as a new theme or alternatively overwrite the existing one.
Here you define the background color, text color, border color and frame shape.
For all these, you can choose to follow a particular pattern,
based on the choices you make in the table below.
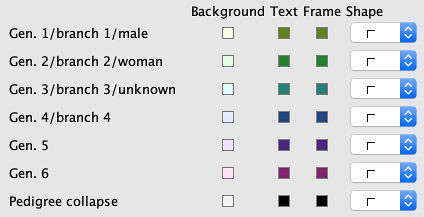
You have five options:
There is also a choice for the main persons pedigree collapse and it applies to all regardless options above.
 By holding down when you change
value of an option you change all in the same category to the same value.
By holding down when you change
value of an option you change all in the same category to the same value.
Where you specify the appearance of the lines that connect the boxes.
Where you specify in which direction you want the trees to spread.
Where you set the alignment of the text in the box.
Where you specify the thickness of the frame, margin, corner factor (rounding of the corner) and the maximum width. If you check the Fixed width all boxes get the same width otherwise, some boxes can have a smaller width. If you check Synchronize height, all boxes get the same height.
Where you set the distance between boxes.
Where you specify if you want a shadow and how it should look.
Where you specify the frame around the tree.
Where you specify the content shown in the boxes.
Where you change the background. In File, you can specify an image to cover the background or an empty box if you do not want an image. If you have selected an image, you can specify how the image is displayed in the list Display where the Size fills both the height and width, Width fills the width, Height fills the height and Repeat fills the background with so many images that fit in its original size.
© Genney