

To document your research using sources is an important part of all research and, of course, also in genealogical research. Data may need to be checked by yourself or another researcher.
When you start looking for ancestors, it's easy to be careless about the sources in the eagerness to move on. There is also a slight threshold to understand how source management works, but you will soon find out that it's a must if you want to deepen your research. How extensive and detailed one is in his source management is of course a personal choice and depend on how much time you are prepared to sacrifice.
In Genney you can add unlimited source references for a person, family or facts.
The source management concept and structure, which is gedcom standard, looks as follows:
- Repository, the physical location where the source is stored, for example an archive.
- Source, material from which the data was retrieved, for example a book.
- Citation, information about a specific area in the source, and where it can be found, for example, a page number or quote.

Source management structure
Repository
Repository is the physical location where the source is located. In the repository window, enter data and contact information, for example, to an archive.
A repository is entered once and can be used for multiple sources.

Source
The source may be a book, video or other material from which the data is retrieved. The source is entered once and can be used for multiple source references.
- Abbreviation, a brief summary description, often the author's name and publication year, is used for presentation in lists and in printouts using the Harvard model.
- Title, source title
- Author, source author, translator, organization or similar.
- Publication, information about responsible publisher, place of publication and year.
- Repository, repository linked to the source.
- Text from source, copied text from the source.
- Comment, personal notes about the source.
- Media, images or other files linked to the source.

Citation
In the citation, enter the details of a specific part or section of a source, eg, a page number, id or the like. The citation is usually used once, but can be linked to several.
- Where within source, page number or similar where the data can be found in the source.
- Date, date when the data was entered in the source.
- Credibility, valuation of source quality.
- Text from source, copied text from source.
- Comment, personal notes about the source.
- Media, images or other files linked to the source.

To enter source data
Many simplify source management by writing a summary text, such as Grytnäs (W) C:1 (1681-1774) Bild 9 / sid 7 (AID: v130243.b9.s7, NAD: SE/ULA/10339) as source.
Of course it is possible to do that, and the most important information is there, but in the long run it becomes very unpredictable. Separating citations and sources also makes it easier to change the information for the source, because it only needs to be done in one place.
In order to simplify and encourage more organized source management, Genney's biography offers an opportunity to enter information about the citation directly in a table.
In the first column, Source, you enter the name (abbreviation) of the source to which you want to link the citation. The rest of the columns are the citation values.

You could then divide the above example as follows:
- Source Grytnäs (W) C:1 (1681-1774)
- Where within source Bild 9 / sid 7 (AID: v130243.b9.s7, NAD: SE/ULA/10339)
You could also take a picture of the section in the source and add to the Media tab and/or enter a plain text of the content in the Text from source tab as in the image example.
If you want to add information about the source select Edit source from the table menu.
Automatic copying of source reference
Since Genney 3 you can paste source references from Riksarkivet and ArkivDigital with automatic division between source and citation. You first copy the source reference in ArkivDigital or Riksarkivet and then select paste special.
Copied source reference: Malmö Sankt Petri (M) AId:32 (1876-1880) Bild 249 / sid 244 (AID: v103901.b249.s244, NAD: SE/MSA/00619)
creates repository: Malmö stadsarkiv
creates source: Malmö Sankt Petri (M) AId:32 (1876-1880), SE/MSA/00619
and citation: Bild 249 / sid 244, AID: v103901.b249.s244

Copy from ArkivDigital

Copy from Riksarkivet

Paste in source reference
Source tree
You can view all your sources and citations in the Sources and citations window that opens through the Handle menu > Sources. There is also the possibility to merge source duplicates.
By default, "empty" citations are not displayed under the source in the Sources and citations window. If you want to edit these citations, you can do it in the biography.
If you check for preferences > general > Use extended alternatives for citations options, the "empty" citations will also appear in the source tree. You also have the opportunity to merge identical citations. If you want to resolve all citations, you can export your registry to a gedcom file and then import to a new registry.
However, a warning should be issued to merge citations. When you change data for a citation after a merge, the change will apply for all objects that are linked to that citation, which you might not had in mind.
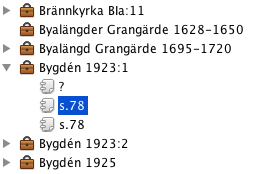 |  |
| Source tree without "empty" citations | Source tree with "empty" citations |
Printing sources
How you want to present your sources, you change in the settings for the template which is linked to the report.
On the General tab, select whether you want the citation to appear according to the Oxford model (a reference to the end of the section or document) or the Harvard model (a summary of the source reference directly after the person, family or fact statement).
What you want to present of your sources, you select under the Tasks tab and then Advanced selection in print settings. In advanced selection, you can change which tasks should be included for the seven different roles (person, parents, family, etc.).
For each role there is a tree where you can select which tasks should be included in the printout. There are two citations in each tree: one for facts and one for the role (person or family). If you want the main person event's citations to contain images, mark the main person and tick the media for citation under facts.
In the same window, there is also Contents of sources, where you can specify which data to include for sources and repositories.
 |  |
| Citations for the role | Contents for sources |
In print settings under the Document tab in the Register box, you can specify whether a Source reference should be included in the print.
There is a special report for sources that lists selected sources and its use, and there are also a number of table-based extracts that relate to sources that can be printed.
If you only take time to familiarize yourself with how source management works, then research will be both better documented and more contentful.
